As the backbone of many home heating systems, oil furnaces require regular maintenance to ensure efficient and safe operation. One crucial aspect of this maintenance is the process of bleeding the furnace. This procedure is essential for the removal of air trapped within the fuel lines, which can impede the efficiency of your heating system.
For homeowners, understanding how to bleed an oil furnace is an invaluable skill. It not only enhances the performance and longevity of the furnace but also contributes to maintaining a comfortable and warm environment in your home. In this guide, we will delve into the significance of regular furnace maintenance and provide you with a comprehensive overview of the bleeding process.
From spotting the telltale signs that your furnace needs bleeding to walking you through the steps involved, this article aims to equip you with the knowledge and confidence to perform this task safely and effectively. Whether you’re a seasoned DIY enthusiast or new to home maintenance, our step-by-step approach will help ensure your oil furnace runs smoothly throughout the colder months.
1. Introduction to Oil Furnace Maintenance
Regular maintenance of your oil furnace is not just about ensuring a warm home during the colder months; it’s also about the efficiency, safety, and longevity of the heating system. An essential part of this maintenance is bleeding the furnace, a process that might sound intimidating but is quite manageable with the right knowledge and tools.
The Importance of Regular Maintenance
An oil furnace, like any mechanical system, undergoes wear and tear. Regular maintenance ensures that every component of your furnace is working optimally. This not only helps in achieving consistent heating but also reduces the risk of unexpected breakdowns. Proper maintenance can also prolong the life of your furnace, making it a wise investment in the long run.
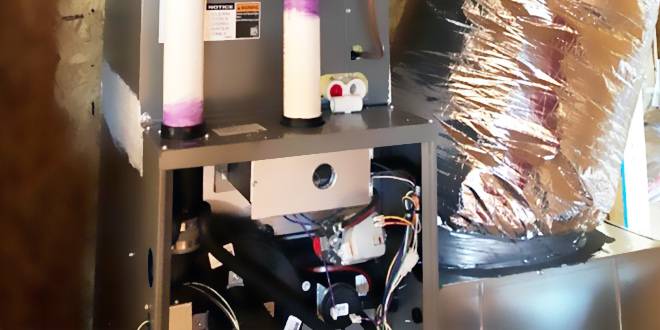
Overview of Bleeding an Oil Furnace
Bleeding an oil furnace is a procedure used to remove air from the fuel line. Air can enter the system in various ways, such as when the oil tank runs empty or during routine maintenance. This trapped air prevents oil from flowing freely, causing the furnace to malfunction or not start at all. Bleeding the furnace is the process of expelling this air, ensuring that pure heating oil is delivered to the furnace burner.
Understanding the need for and the process of bleeding your oil furnace can significantly impact its efficiency. It is a relatively simple procedure that most homeowners can do. However, it’s crucial to follow safety guidelines and understand each step of the process thoroughly.
In the next section, we’ll discuss the signs that indicate your oil furnace needs bleeding and why this process is so vital for the health of your heating system.
2. Signs That Your Oil Furnace Needs Bleeding
Recognizing when your oil furnace needs bleeding is crucial for maintaining its efficiency and functionality. Here are some common symptoms to watch out for:
Identifying Common Symptoms
- Furnace Fails to Start: If your furnace doesn’t start, it could be due to air trapped in the lines, preventing the flow of oil.
- Unusual Noises: Gurgling or spluttering sounds from the furnace often indicate air in the system.
- Inconsistent Heating: If your furnace starts but fails to heat your home evenly or adequately, this might be a symptom that bleeding is necessary.
- Furnace Stops Unexpectedly: A furnace that stops running, especially soon after starting, may have air in the fuel lines.
Understanding Why Bleeding is Necessary
Air in the oil furnace’s lines can be more than just a minor inconvenience. It can:
- Prevent Ignition: Air pockets can block the flow of oil to the burner, preventing the furnace from igniting.
- Reduce Efficiency: Trapped air can cause the furnace to run inefficiently, leading to higher fuel consumption and costs.
- Cause Wear and Tear: Continuous operation with air in the system can strain the furnace’s components, leading to quicker wear and tear.
Bleeding your oil furnace is a proactive measure to ensure its efficiency and longevity. It’s a straightforward process that can prevent these issues and keep your heating system running smoothly.
In the next section, we will discuss how to prepare for bleeding your oil furnace, including the safety measures to take and the tools you will need for this task.
3. Preparing to Bleed Your Oil Furnace
Proper preparation is key to safely and effectively bleeding your oil furnace. Here’s what you need to do before starting the process:
Safety Measures and Necessary Tools
- Turn Off the Furnace: Ensure your safety by turning off the furnace before you start. This prevents the system from starting up while you’re working on it.
- Gather Your Tools: You will need an adjustable wrench, a small container to catch the oil, and clean rags. Make sure you have these items on hand before you begin.
- Wear Protective Gear: It’s advisable to wear gloves and safety glasses to protect your hands and eyes from oil splatters.
Initial Steps Before the Bleeding Process
- Locate the Bleeder Valve: This is typically a small nipple-like valve found on the furnace’s fuel pump. Refer to your furnace’s manual if you’re unsure of its location.
- Position Your Container: Place the container under the bleeder valve to catch any oil that comes out during the process.
- Prepare the Area: Lay down newspapers or rags around the work area to catch any spills. Keeping your workspace clean will make the process smoother and safer.
With these preparations complete, you are now ready to start the bleeding process. It’s important to follow the steps carefully and take your time to ensure the procedure is done correctly and safely.
In the next section, we will guide you through the bleeding process, providing a detailed walkthrough of each step you need to take.
4. The Bleeding Process: A Detailed Walkthrough
Bleeding your oil furnace is a precise process that, when done correctly, can significantly improve the efficiency of your heating system. Here’s a step-by-step guide:
Step-by-Step Instructions
- Turn on the Furnace: Begin by turning on the furnace. This activates the fuel pump, allowing you to bleed the system effectively.
- Loosen the Bleeder Valve: Using your adjustable wrench, gently loosen the bleeder valve. Be careful not to remove it completely.
- Watch for Oil and Air to Emerge: As you loosen the valve, a mixture of oil and air will start to come out. Let the oil flow into your container.
- Identify a Steady Stream of Oil: Wait until you see a steady stream of oil with no bubbles. This indicates that most of the air has been bled from the system.
- Tighten the Bleeder Valve: Once the air is expelled, carefully tighten the bleeder valve back into place, ensuring it’s securely closed.
- Check the Furnace Operation: Turn on the furnace to see if it starts properly. If it doesn’t, you may need to repeat the bleeding process.
Tips for Effective and Safe Bleeding
- Be Patient: The process can take a few minutes, so be patient and let the oil flow until you’re sure the air is expelled.
- Handle Oil Carefully: Be mindful of oil spills and dispose of any waste oil properly.
- Monitor Furnace Performance: After bleeding, observe your furnace’s performance. Improved heating and smoother operation are good signs that the process was successful.
Bleeding your furnace is a practical skill that can save you time and money, ensuring your heating system works efficiently when you need it most.
Next, we will look into post-bleeding checks and maintenance tips to ensure your furnace continues to operate at its best.
5. Post-Bleeding Checks and Maintenance Tips
After successfully bleeding your oil furnace, there are a few checks and maintenance tips to follow. These ensure your furnace continues to operate efficiently and safely.
Ensuring Successful Bleeding
- Observe the Furnace’s Start-Up: After bleeding, the furnace should start smoothly without hesitation or strange noises.
- Check for Leaks: Ensure there are no oil leaks around the bleeder valve or any other parts of the furnace.
- Evaluate Heating Efficiency: The furnace should heat your home evenly and consistently. Noticeable improvements in heating efficiency indicate a successful bleeding process.
Ongoing Maintenance for Optimal Performance
- Regular Filter Changes: Change or clean the furnace’s filter regularly to maintain airflow and efficiency.
- Annual Inspections: Schedule professional inspections annually to ensure all components are functioning properly.
- Monitor Fuel Levels: Keep an eye on your oil tank’s level to avoid running out of fuel, which can introduce air into the system and require further bleeding.
- Keep the Area Clean: Ensure the area around your furnace is clean and free from flammable materials.
By following these post-bleeding checks and maintenance tips, you can prolong the life of your furnace and enjoy consistent, efficient heating in your home.
Take Control of Your Comfort with Cartwright Heat & Air!
Don’t wait for heating issues. Learn how to bleed your oil furnace safely and efficiently. Equip yourself with the skills to ensure a warm, cozy home all winter long. Be proactive – contact us today and master this valuable DIY skill. Your comfort is in your hands!